About paper
Czech originalExperience Physics
In this contribution I am going to describe several experiments which can serve to liven up the physics classes (especially in secondary school) and to get a more in-depth understanding of a given problem from various physics seminars or workshops. I prepared these experiments within my physics teaching on the Přípotoční grammar school in Prague and while leading physics workshops for secondary school students at the Faculty of Mathematics and Physics, Charles University in Prague.
Centrifugal force
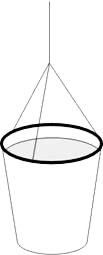
Fig. 1
The famous water bucket experiment which demonstrates the effects of centrifugal force can be easily reproduced with a small plastic cup and strong cord.
Three symmetrical holes are pierced along the edge of a plastic cup, and the cup is suspended from an approximately 0.5 m long cord (see fig. 1).
The cup is then filled almost to the brim, the string is grabbed with one hand and the cup is spun around in a circle. If the correct starting and stopping of the cup is practiced, it is possible to spill no water at all. This experiment is, of course, more entertaining if performed by a student.
The students then have to try and explain why the water doesn’t spill even if the cup is upside down and then think of real-life situations, where this phenomenon occurs (e.g. carnival amusements, various centrifugal machines etc.).
Using this experiment, it is also possible to illustrate the difference between inertial and non-intertial reference frames. In an inertial reference frame we have to work upon the cup with centripetal force to make it follow a circular trajectory (otherwise, it would go in a straight line, if the Earth’s gravity is ignored). This force can be felt in our hand while spinning the cup.
From the point of view of a non-inertial reference frame the cup is worked upon by inertial centrifugal force which holds the water inside the cup even if turned upside down (if we pierced a hole in the bottom of the cup, water would jet out). This inertial force works only within the non-inertial reference frame of the cup, and cannot be observed in an inertial system.
In contrast to the traditional way of performing this experiment (i.e. with a bucket full of water), a spill from the cup will cause almost no damage. It also often happens that while doing this experiment with a bucket, the handle falls off and the flying bucket can harm passers-by. It is therefore better to perform this variation somewhere outside with a sufficient distance from any onlookers.
Shooting blocks
A classical example of the conservation of energy and momentum is determining the speed of a projectile using the ballistic pendulum. Another way to determine the speed of e.g. an air rifle pellet is to measure the distance that a wooden block travels after being shot at with the pellet.
A wooden block with the weight M is placed on a wooden board placed on a table and shot from close distance with the air rifle, so that the pellet with the weight m travels horizontally, if possible. The wooden block will then move a certain distance s away.
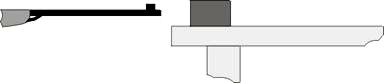
Fig. 2
From the law about conservation of momentum this equation follows: mv = (m + M)w, where v is the velocity of the pellet we are looking for, w is the initial velocityof the block after impact, which is calculated using the law of conservation of energy – the kinetic energy of the block with the pellet “stuck in” equals the work of friction forces needed to stop the block.
gis the gravity of Earth, f is the coefficient of friction between the wooden board and the block.
From these two equations, we get the equation for determining the speed of the pellet: \[ v= \frac{m+M}{m}\sqrt{2gfs} \] The coefficient of friction f can be calculated using one of the conventional methods, e.g. measuring the angle at which the block slides uniformly on the wooden board, see [1]. Other quantities are simply measured and weighed.
This experiment can be used for demonstration or as a lab experiment for groups of students. Naturally, maximum security precautions must be taken in handling an air rifle, and students should be allowed to shoot an air rifle only under the supervision of the teacher. The theoretical relation for the speed of the pellet can be left to the students to derive on their own. When deriving, it is good to point out the importance of the law of conversation of momentum, we cannot use the law of conservation of energy alone. This is because it is impossible to determine the amount of energy used up by the “digging in process” of the pellet into the block.
The weight of the wooden block should be approximately 100 – 250 g. Lighter blocks move too fast – they jump about, so the work of the friction forces does not manifest itself over the whole distance and the result is distorted. When we use a 200 g wooden block and a 0.47 g pellet, the block goes approximately 5 cm over the wooden board.
Note: This experiment was performed in detail at the workshop for future physics teachers in MaláHraštice by me (see [2]).
Brownian motion
A very simple experiment on the qualitative observation of Brownian motion can be performed with a laser pointer and a test tube.
Pour a little water with a few drops of cream into the test tube. Alternatively, use a small amount of latex to create a Brownian particle solution. The test tube is then fastened to a lab stand, the laser pointer in a second so that the laser beam goes through the round bottom of the test tube and falls on a white shade 2 – 3 meters away from the test tube (see fig. 3).
The laser beam is scattered when going through the test tube with the solution, similarly to using a converging lens, and then the image with the diameter of around 30 cm can be seen on the shade. The laser light bends on the chaotically moving particles of the solution and on the shade we can see an enlarged moving image which proves that the particles are in motion.
It is more suitable to perform this experiment in dim lighting, due to the low intensity of the laser beam. Initially, downward motion is mostly seen, this is the cream mixing with water. After calming down, chaotic movement can be observed.
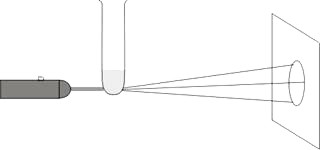
Fig. 3
The advantage over using a microscope is the collective phenomenon observation without the need for expensive technical equipment.
Note: The suggestion for this experiment was taken from the periodical Physics Educations (see [3]).
State of equilibrium
The next experiment is a fun way to show students the behaviour of gas on a molecular level.
To prepare this experiment we need a sufficient amount of newsprint, which is then crumpled into approximately 50 – 100 paper balls. A classroom, its portion, or a small corridor is then divided into two equal halves using tables or chairs. An equal number of students stand in each half of the space (we choose the number of students according to the size of the room), at least one person must be “off-field”.
In the beginning, all paper balls are placed into one half of the field. One student or teacher standing outside the space measures the time e.g. 5 seconds for each round using a stopwatch. Once the start is announced with a shout, all students must throw paper balls over to the other side of the classroom.
Once the person with the stopwatch announces the end of the round, everybody must stop throwing. Balls on each side of the field are counted and the result for each half is written on a blackboard/in a notepad.
Another round follows, and all the students try to throw as many balls as possible from their side to the other. It is good to set some rules, e.g. a person can only throw only one ball at a time and students should not try to hit balls mid-air. The resulting number of balls on both sides is counted and written down and the “game” repeats until the number of balls on both sides is more or less equal for several rounds.
In the end, all the balls are collected and we try to explain the analogy between this experiment and the behaviour of gas. The paper balls represent the molecules of gas, which are, in the beginning, gathered in one half of a container, partitioned off from the other side. If we remove the divider, the molecules will, due to the chaotic movement and collisions, get into the other half (as with the ball throwing) and we can observe the amount in both parts of the container at regular intervals. If the conditions are equal in both sides (equally good throwers, who do not cheat and symmetrical halves including the possible obstacles), the amount of molecules (paper balls) will become equal after a certain time – we get thermodynamic equilibrium of the system.
It is interesting to observe the number of balls on each side with time and draw a graph of this dependence. Its curve should be fairly exponential; with the use of fewer balls, longer time intervals and asymmetrical conditions, this dependence can have larger deviations.
Note: An analogy with the behaviour of gas can, naturally, be explained to students before the start of the “game”, when explaining the rules.
If one group is noticeably more efficient when throwing the balls, we can let students search a cognate example from real life, e.g. a higher-temperature gas in one partition will have a smaller density.
A discussion on the deviations of measured numbers from theoretical results in relation to the total number of balls (molecules) and other analyses of this experiment can be found in [4].
Energy of a spring
The experiment is suitable for a simple explanation of the quadratic dependence of the energy of a string on its lengthening.
To perform the experiment we need two identical springs (e.g. from an oscillation school kit), two chemistry stands, one 50 – 100 g metal ball or a similar object, a length gauge, and a piece of cardboard or leather.
One end of each spring is connected to a stand and the other is joined to the other spring with a piece of leather, creating a simple slingshot capable of shooting a ball vertically upwards (see fig. 4). The springs should be parallel, if possible.
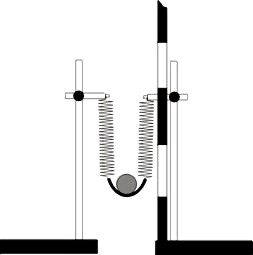
Fig. 4
We affix or hold a length gauge next to the springs and write the height of the lower end of the springs. Then we place a ball into the slingshot, pull the springs a couple of centimetres lower and let the ball shoot upwards. We observe how high it flew from its lower position and note this value. We can observe the height on the length gauge, or note the high point of the ball on a nearby wall and then calculate the value using the two numbers.
The energy of the springs (quadratically dependent on their lengthening) is used to change the potential energy of the ball (linearly dependent on the height of the shot). Due to this fact, if the lengthening of the springs is doubled, the height to which the ball travels should be four times larger.
This experiment can also be performed as a lab exercise to prove the equation for the energy of a spring, or alternatively as an additional exercise to measure the stiffness of springs using conventional methods. Naturally, we assume that the stiffness of the two springs forming our slingshot adds up, and so their energies add up as well.
Note: It is necessary for the ball to be sufficiently high in relation to the stiffness of the springs used. If the ball is too light and the springs too stiff, not all energy is transferred to the ball (the springs oscillate too much after shooting) and the result is distorted.
The experiment can be performed with rubber bands as well (a regular slingshot). Their elastic characteristics are, however, not as linear as those of springs.
J. Kekule wrote an interesting contribution to the last years Physics Teacher’s Inventions Fair on the topic of energy transfer from a slingshot to a projectile, see [5].
Faraday cage
A simple variation of a very impressive experiment proving the effects of the Faraday cage can be performed using a Ruhmkorff induction coil.
Apart from the induction coil we need a piece of cloth, alcohol, pliers with insulated handles, a container of water and a fine wire mesh, or e.g. a wire gauze from a chemistry kit.
First, we bend the wire mesh into a U shape, or create a small cage with an opening on one side. We soak the piece of cloth in alcohol, insert it inside the cage and hold that with pliers in the spark gap of the induction coil.
After turning the coil on we can see the discharge between electrodes going through the cage with the cloth; the discharge doesn’t set the alcohol on fire, because the discharge travels along the outer side of the conductive cage.
In the second part of the experiment the cloth is grabbed with pliers and held in the spark gap without the cage. After turning the induction coil on, the cloth catches fire immediately – We extinguish the fire in the prepared water container.
After the experiment we can have a discussion with the students on the topic of storm protection inside a car, or other metal structures, as well as the protection of various electronic devices from a strong electric field within a metal case.
Electromagnetic induction
The last experiment demonstrates, in a simple way, the effects of electromagnetic induction, which we can feel first-hand.
We need a 12 000 wrap coil with a U core and a large horseshoe magnet, same size as the core – everything can be found in a take-apart transformer set, and two wires.
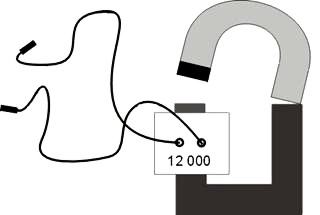
Fig. 5
The coil is placed on the core and two wires are connected to the outputs. We tell someone to hold the other ends of the wires in their hands and snap on the magnet, creating a closed magnetic circuit. By quickly creating a magnetic field inside the core, the coil (with its many wraps) induces a high voltage, which is felt by the person holding the wires as a tingling sensation.
The intensity of this sensation depends greatly on how wet the person’s hands are, therefore we snap the magnet slowly at first and if the tingling is weak, we snap the magnet a little more forcefully. It is good to try the experiment on yourself first.
The students can also be asked to find answers to questions: “Is it better to have your hands dry, or make them wet in water? What if two people held one end of the wires and each other’s hand?”
In the first case, when one person holds the two wires, it is obviously better to have dry hands, which mean a greater transition resistance between the conductor and human skin, and therefore smaller current going to the “plugged in” person.
In the case of “two people connected in series”, the same current flows through both people, but will dissipate more on the person with greater resistance, the one with dry hands. In this case, the person with the dry hands will feel a bigger tingling, because electrical energy acting upon the nerve endings released over constant time is the multiple of voltage and current.
Similarly, we can observe the effects of “two people connected in parallel”.
Literature
[1] Bednařík, M., Široká, M.: Fyzika pro gymnázia – Mechanika. Prometheus, Praha 2000, Laboratorní cvičení 5.
[2] Spring workshop for physics teachers on the Faculty of Mathematics and Physics, Charles Univeristy and “kindred spirits”
[3] Krulak, H.: Brownian motion with a laser. In: Physics Education, Volume 30, March 1999.
[4] Carson, S., R.: An interactive pupil demonstration of the approach to dynamic equilibrium. In: Physics Education, Volume 34, January 1999.
[5] Kekule, J.: Měření kinetické energie střely z praku. In: Sborník z conference Veletrh nápadů učitelů fyziky 7, Praha 2002. Ed. Svoboda, E., Dvořák, L., str. 168 – 171.
[6] Svoboda, E.: Pokusy z fyziky s jednoduchými pomůckami, Prometheus, Praha 1995.