About paper
Czech originalExperiments with infrared radiation – suggestions
Abstract
This contribution is meant for teachers who are looking for ideas for students’ individual work. It shows that simple or easily available tools can help one to study the properties of objects that we cannot perceive by senses. Students can make a black filter that transmits short-wave infrared electromagnetic radiation according to the instructions given in the article. A digital camera equipped with such a filter shows the invisible part of the spectrum – the infrared radiation. Students themselves can search answers to questions about opaqueness and transparency of various materials, about sources of infrared radiation and its basic features.
Infrared radiation and its sources
Infrared radiation, abbreviated as IR, is of the same nature as visible light, but its wavelengths are larger. They span between red light (about 750 nm) and microwave radiation (about 1 mm). We cannot see it directly but with certain technical means. Our experiments cover only the short-wave region of the IR spectra. Two most common types of infrared sources are hot objects (infrared heaters, light bulbs, candles, fire, etc.) and IR light-emitting diodes (LEDs). A common light bulb changes only a few percent of the input into visible light and the rest is emitted as IR light. In our experiments, we use the so called infrared light bulb because we do not need visible light. Its filament temperature is substantially lower than that of a common light bulb. It is usually additionally provided with a red glass. It gives less light but more heat, in other words, it emits almost all energy in the infrared region. We say it is a broadband infrared light source. If the bulb is not convenient for us, we can use an IR LED that emits IR light in a narrow range of wavelengths.
In addition to an IR source, we need an IR detector. We have two options. We can use an IR LED or a digital camera.
LED as both IR source and detector
We can make a universal infrared source-detector. We connect an infrared LED in series with a 250 Ω resistor, attach cables with banana plugs to it and put the diode with the resistor in a metal tube. Connecting to a DC source (battery) turns the device into an infrared source; with a voltmeter instead of the source it turns the device into a detector. In the latter case we utilize the fact that the diode works as a gate sensitive to the same radiation which it emits when connected to a source. When we aim the tube at different sources, we can compare how intensively they emit the infrared by reading generated voltage.
Digital camera as an IR detector
A digital camera with a black (visible cut-off) filter can work as an IR detector. All cameras have an infrared cut-off filter that limits their sensitivity to that type of radiation. Cheap cameras have quite low quality filters and have a residual IR sensitivity which we can utilize. We need just to equip the camera with a good black filter that transmits only IR light. It is also possible to use a night-vision camera but it is not a common and cheap article.
Black filter
We skip the possibility to buy an expensive professional filter and make one ourselves. The following options are probably the most available ones:
1) Exposed and developed color print film is quite a dark filter that absorbs also a part of the short-wave infrared radiation. Its main disadvantage is its small size.
2) Crossed polarizers. Liquid crystal displays provide quite large and quality polarization filters that transmit linearly polarized light. If we put two polarizers one after another so that their planes of transmitted light polarization are perpendicular to each other, almost no light is transmitted through them. Common polarizers do not polarize IR light and transmit it with a minimal absorption. Unfortunately, one pair of crossed polarizers is not usually enough to cut-off all visible light.
3) The ink of some black markers (felt-tip pens). How to make a filter from a marker? We need a small wooden plate, some plastic adhesive (like Blu-tack, Tack-it, Tack-all, Gumfix, etc.), a clean piece of glass, black alcohol marker CENTROFIX 2846 Permanent, a sharp knife, two pairs of tweezers, alcohol and a dropper or syringe. We stick the glass a millimeter or two above the surface of the wooden plate with 3-4 pieces of the adhesive. We choose the size of the glass according to its future usage as a filter. We can use a microscope or reversal film slide, or larger pieces of common glass. We cut off one end of the marker and carefully pull out the ink reservoir with a pair of tweezers. It is made of an elastic polyethylene tube filled with felt. The next procedure should be made with protective gloves and in clothes that you do not care much about. We hold the reservoir with one pair of tweezers above the glass and pour a few drops of alcohol in it with the dropper or syringe until there forms a drop on the lower end of it. An older and drier marker will need more alcohol. Then we catch the upper end of the plastic reservoir with one pair of tweezers and wring it out moving downward a moderately pressed pair of the other tweezers, as if we squeezed toothpaste out of the tube until we get enough ink on the glass. One marker provides enough ink to cover 1-1.5 square decimeter of the glass. We spread the diluted ink on the whole glass by careful inclining of the wooden plate not spilling it over the edges of the glass. Then we let the layer dry. It forms a relatively tough film. We can check the darkness of the filter by looking through it on the filament of a common 60 W bulb. We should see it shining through only weakly in dark red. To protect the filter against scratching, we can paste it over with transparent PSA tape which slightly worsens its optical properties but increases its mechanical endurance. Other possibility of protection is to put together two perfectly dry filters with dyed sides facing each other. This filter is a visible light cut-off filter thence a black filter. If we need small filters, we make more of them at once to utilize the whole ink fill. We cover the objective of a digital video camera, a still camera or a webcam. The filter absorbs visible light and passes infrared. We observe different objects with the camera in false greyscale according to their IR reflectivity.
Experiments with IR radiation
1) Existence of invisible radiation
We need a slide projector without plastic parts that would be damaged by heat. We remove the greenish heat-absorbing glass plate that is located between the lenses of the condenser. We place a slit in the place of the slide and a prism in front of the projector to create the spectrum on a screen. We connect the IR LED to a voltmeter and aim it at the prism. If we place the diode next to the red part of the spectrum to the area that seems to be dark, voltmeter shows a significant voltage.
Let us point the diode at various light sources: light bulb, fluorescent lamp, white LED and a candle. We can see that the bulb and the candle are sources of intensive IR radiation while fluorescent lamp and white LED emit mostly visible light. We can also place various materials between the source and the IR LED. The decrease of voltage shows how much of the infrared light (or heat) is absorbed in each material.
2) Transparent and opaque
We prepare a camera with a black filter and switch on the lamp. We observe the image on the screen and put an easily observable object in front of the camera and light it up with the lamp. Then we cover the object with various materials and ask the students if it is visible with the naked eye (in visible) and if we can see it with the camera (in infrared).
We can qualitatively divide all observed materials in a table:
| Some examples of different properties of water solutions | ||
|
|
transparent in infrared |
opaque in infrared |
| transparent in visible |
pure water |
blue vitriol solution |
| opaque in visible |
ink or permanganate solution |
Indian ink solution |
We can let students to study various materials themselves.
You can study anything and find very interesting phenomena. Here we provide some suggestions:
- writing on various products, banknotes
- minerals, transparent colored crystals, ceramic surfaces, colored glasses, plastics
- liquids and solutions of different colors
- various filters (heat, infrared, colored, etc.)
3) See beneath the surface
It is a variant of the previous experiment. We show that the glass plate with the black filter is opaque to visible light. If we draw something with a soft-lead pencil on a white piece of paper and cover it with the black filter, the drawing cannot be seen. If we watch the covered drawing with our camera, the drawing is visible. A black-and-white photograph is also very effective. We cover it with a black filter so that it is not visible (Figure 1). The black filter is infrared transparent and we can see the photograph with the camera (Figure 2). Thus we can see beneath the IR transparent surface of many things.
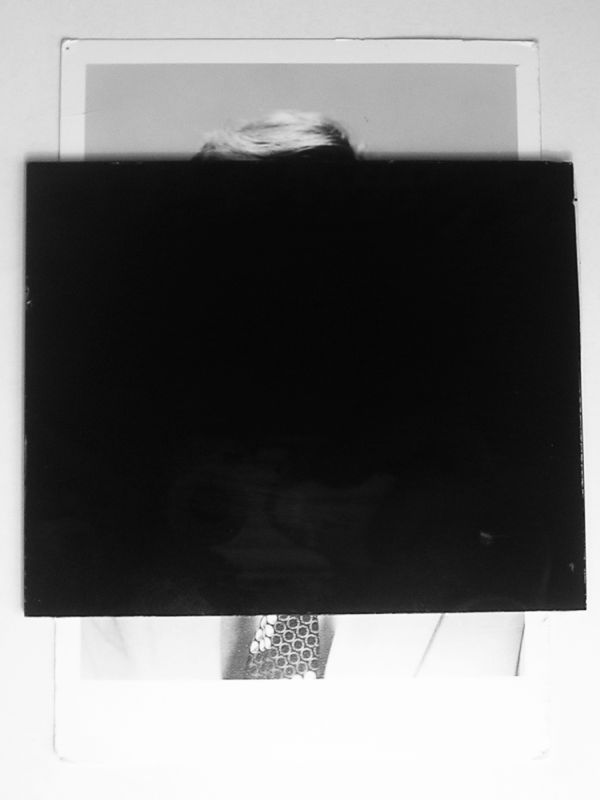
Fig. 1 Picture of a black-and-white photograph covered with a black filter taken in the visible light mode.
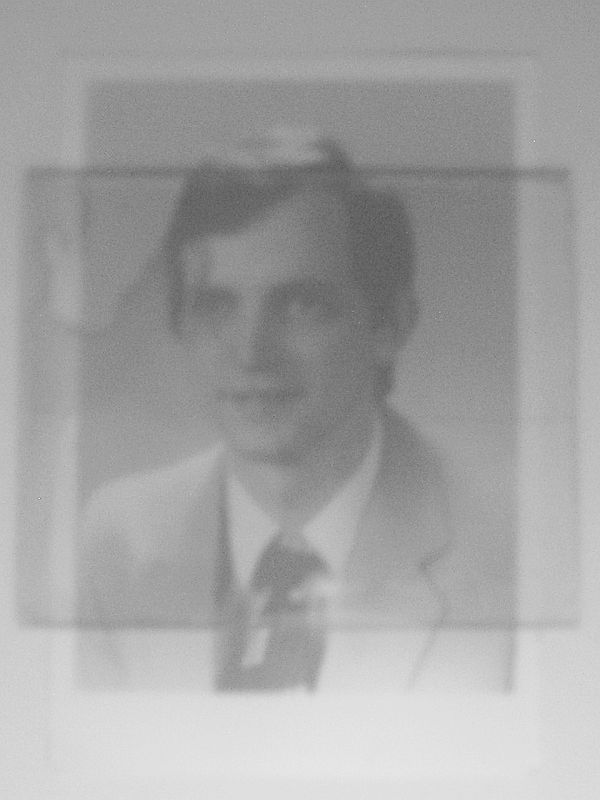
Fig. 2 The same picture as in Fig. 1 in the infrared. The black filter is only slightly grey in this case.
The following two figures show three optically different objecst: The first are three coins under a triplet of blue, red and green filter; the second is a coin under the heat-absorbing glass plate from the slide projector; the third are two keys under the black-marker filter.
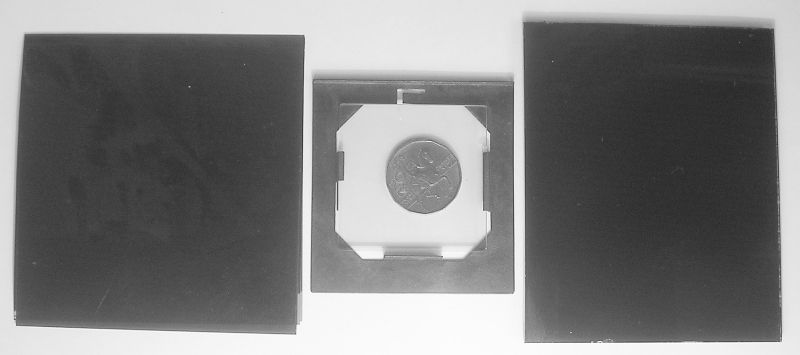
Fig. 3 Picture taken in the visible
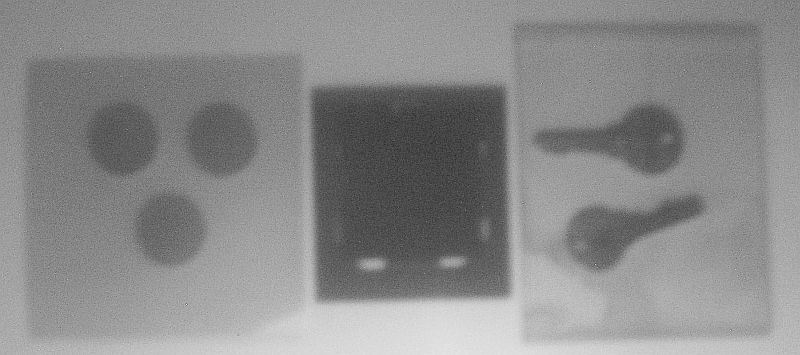
Fig. 4 Picture taken in the infrared
4) Signal transmission by infrared radiation
First we need to create the transmission system. Anything that has a 3.5 mm jack output (such as an MP3 player) can serve as the signal source. The transmitter is made of an infrared LED connected in series with a 300 Ω resistor to a 4.5 V battery. We lead the signal from the player through a 20μF capacitor. (See Figures 5 and 7.) The signal from the player modulates the current through the diode and thence the intensity of emitted infrared radiation.
The receiver consists of an IR phototransistor connected to the input of an amplifier. The phototransistor should be placed in a tube that limits the receiving angle. We can use the sound card of a PC. Its advantage is that the micophone input is already powered and we can connect the phototransistor directly to the card. See [3] for more details. A regular amplifier needs a power source for the phototransistor (see Fig. 6).
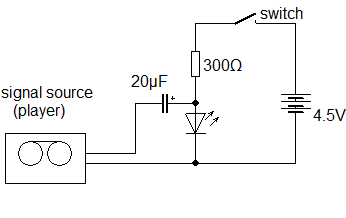
Fig. 5 Circuit diagram of a transmitter with an IR LED.
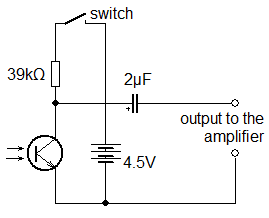
Fig. 6 Circuit diagram of the detector of an IR receiver.
We can use the transmitter-receiver set for many simple experiments.
We can examine the ability of different materials to transmit or even reflect IR radiation.
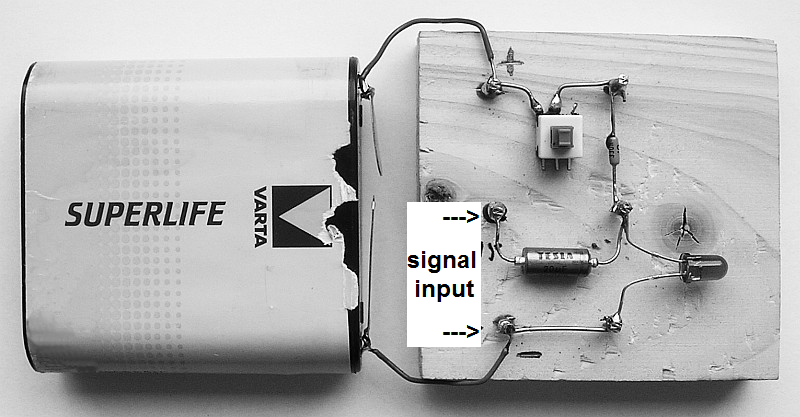
Fig. 7 Practical design of an IR transmitter made with the method of soldering on nails half-hammered into a wooden plate.
Literature
[1] Strumienský J.: Experimenty s infračerveným a ultrafialovým zářením (Experiments with infrared and ultraviolet radiation), Master thesis at the Faculty of Natural Sciences, Masaryk University, Brno 2009.
[2] Hadrava J., Tvrdík J., Horodyská P.: Infračervená fotografie (Infrared photography), a high school students’ project at the summer camp “Soustředění mladých fyziků a matematiků”, Plasnice, August 2008.
[3] Dvořák L.: Pokusy se zvukovou kartou (Experiments with sound card). Dílny Heuréky 2005, s. 39-48.