About paper
Czech originalAmateur Astronomy with a Camera
The aim of this contribution is to show some possibilities that present-day technologies (a digital camera in combination with a computer) offer in the area of observing celestial phenomena. The activities described here are chosen so that they can be used as a basis for students’ projects and laboratory work at secondary schools.
Accompanying photographs were taken by a digital reflex camera Nikon D60 with two objectives – a wide-angle lens Nikkor 18‑55 mm and a telepohoto lens Nikkor 55‑200 mm. In most cases it is possible to use a common compact camera with a better zoom.
1. Horizon Calendar
It is a huge surprise for most students (and surprisingly many adults) that the Sun does not rise every day at the same spot on the horizon (i.e. in the east). The documentation of sunrises or sunsets is therefore a great idea for a long-term project. The camera gives record of individual sunrises in this case. It is simple to create a panoramic picture with marked positions of sunrises on individual days on a computer. In this way we make a “horizon calendar” – we match individual positions on the horizon with dates of the calendar. It is virtually the only means to find out from the Earth that exactly one year has passed – when the Sun rose again in the same place as in the beginning of the observation.
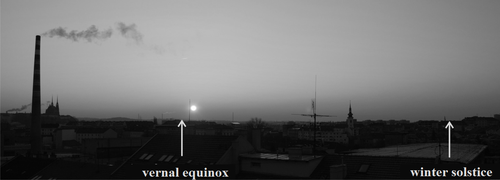
Figure 1 – The southeast horizon in Brno
The project has two significant limitations – most people do not live in a place with a good view of either the east or the west horizon; moreover the time of sunrise changes greatly during the year (enthusiasts have to get up before 5 a.m. in summer and the classes begin before the sunrise in winter).
The project can be assigned as a week-long observation in the time of vernal or autumnal equinox. The sunrises take place just before leaving for school and the day-to-day shift of the sunrise position is the largest in this term – more than one sun disc diameter every day. The Sun rises almost in the same place during a longer period around the solstices.
It is possible to analyze the possibilities of prehistoric stone observatories in connection to the observations mentioned above. I recommend reading the book in reference [1] that deals with these issues in detail.
2. The Influence of Longitude
Active students can work out another topic during summer holidays – how strongly the longitude and latitude of the observer influence the time of sunrise/sunset. The sunrise differs by one hour in two places that differ in longitude by 15° (= 360° divided by 24 hours).
Every student can record the times of sunrises and sunsets during the holiday (ideally on the coast where one can watch sunrises/sunsets against ideal horizon of the sea surface). A careful observer can distinguish the time of sunset observed in Zakar from that observed in Makarska – the longitudes of these two places differ 1.77° in latitude which causes a time shift between 7 and 10 minutes (depending on the phase of the year).
The latitude of the observer also has an influence on the time of sunrise and sunset times and must be included in the case of more precise calculations based on measured values.
The students should compare their records after they return to school.
3. The Trajectory of the Sun
Another topic is the observation of the trajectory of the Sun during sunrise or sunset. We need a set of photos of the Sun just above the horizon taken with a maximal possible zoom during one sunset or sunrise. Taking pictures of the Sun disc just above the horizon that is observable with the naked eye means no hazard to the camera. It is ideal to use a tripod and a remote control. Pictures taken with hand-held camera can be adjusted in the computer according to the details on the horizon to make a set with fixed horizon. It is possible to reconstruct the Sun’s trajectory based on the set. I must admit that I was surprised by the “flatness” of the trajectory of the setting Sun – I had never noticed that before.
The Sun sets perpendicularly to the horizon for an observer on the Equator. For an observer on the Pole it circulates on the horizontal level. The inclination of its trajectory for other observers corresponds to the latitude of the observation point. The angle between the trajectory of the setting Sun and the vertical line is about 47° in Brno (49° north latitude) – the angle changes a little bit in the course of a year.
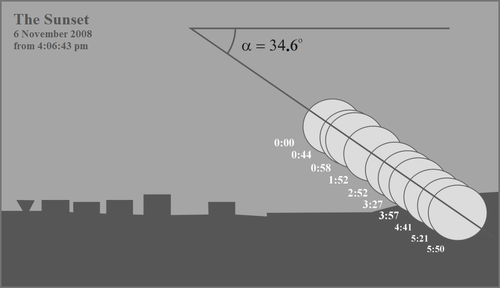
Fig 2 – Sunset in Brno above Kohoutovice
4. Light Refraction
Another debt of the modern civilization is that only very few students know that the sun disc is flattened near to the horizon although this phenomenon is very well observable with the naked eye.
It is good to use a camera with as large focal length as possible (maximal accessible zoom). Using a computer we measure the height and the width of the sun disc and compare them with each other. The flattening reaches a value of 13%.
We can document the gradual deformation of the Sun according to its height above the horizon with the set of photos taken during the sunset.
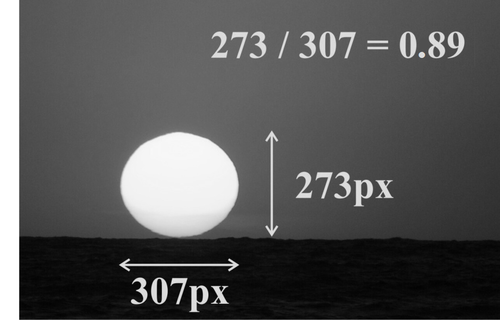
Fig 3 – The Sun setting above the sea
5. Angular Diameter of the Sun
If we want to use the camera to measure certain quantities, we have to calibrate it first. One of the possibilities is to take a picture of an object of a known size placed at a known distance. I used a ruler placed 360 cm from the camera. I took a picture of the ruler with focal length 200 mm which I used for taking detailed pictures of the sun disc. One centimetre of the ruler measures 96 pixels on the picture. One ninety-sixth of a centimetre viewed from 360 cm corresponds to 0.099 minute of arc.
The sun disc in the photograph is 312 pixels wide which correspond to 31.04 minute of arc. This value differs by 3 % from table value 32.03’.
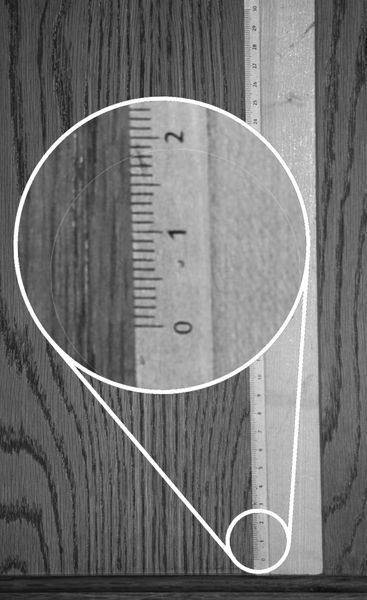
Fig. 4 – A Ruler
6. Methodical Notes
A computer is quite common in today’s families. We can assign the tasks mentioned above as homework when we provide required photos on the Internet.
Should you lack some needed photographic equipment and/or the luck for good weather and a proper view of the horizon, use my photographs that can be downloaded from website [2] – link “Podklady”.
I thank Dr. Poláček from ÚFE MU for his valuable comments on this article.
Reference
[1] Ministr Z.: Géniové dávnověku. Praha: Mladá fronta, 2007. ISBN 978-80-204-1454-0
[2] http://www.fyzikapricni.websnadno.cz
[3] http://www.pf.jcu.cz/stru/katedry/fyz/veletrh/polacek.doc - Poláček L.: Poloha Slunce na zemské obloze (The position of the Sun on the sky of the Earth) a contribution at the Physics Teachers Invention Fair 2003, České Budějovice