About paper
Czech originalPot-Physics
Introduction
There is a tendency to use many different aids in lessons of physics. Which teacher has never used a plastic bottle in his or her lecture? The simple aids are very popular because of their low (almost nothing) cost and easy access. Another important fact is that the students can perform the experiments at home. A teacher can give them homework of an experimental character that would be not so easy using commercial aids.
We can easily use everyday objects in the lessons. Then students notice that the physics is everywhere. Alternatively, the use of unusual aids can refresh the process of learning. It is not necessary to perform extremely difficult experiments; the untypical aids draw the attention and curiosity of the students like a magnet. Several experiments based on a simple pot are described in this article. The pot fulfils everything that has been previously claimed. It is an aid easily accessible both for the teachers and the students and it is a quite unordinary object which will draw the students’ attention, especially in a lesson of physics. A lot of phenomena of different fields can be demonstrated easily. The experiments are not extremely innovative, but it is possible to perform them with the use of other typical aids. The aim of this article is just to inspire teachers to perform the experiments in a non-traditional way which is significantly different form the classical one.
The pot in lessons of electrostatics
One of the simplest experiments, provided at grammar school, is the electrification of objects. A lot of aids such as electrostatic pendulums, electroscopes, plastic and glass tubes, flannel towels, leather and many others are commonly used. Some teachers make an electroscope from a jam glass or a tin. Let us try to see that all the basic experiments in electrostatics can be done with a pot.
The best choice is a stainless-steel pot, which is a common piece of equipment of the household. It is necessary to place the pot on an isolated support such as a piece of polystyrene or stable glass which is also suitable for this purpose. Cut a couple of strips of aluminium foil, 2cm wide and 10 cm long. Fit the size of your strips to the size of the pot. Bend one edge of the strip to create a hook which enables hanging of the strip up on the edge of the pot. Curve the strip around the pot but do not make a sharp edge-it would not allow the strip to move around. The pot with the hanging strips acts as an electroscope (fig. 1). Charge it with a plastic tube which has been wiped by a piece of rag (you may draw the students’ attention by wiping the tube with the sweater you are wearing). Rub the tube against the pot, turning it all the time to wipe all the charge off from its surface. The strips are tilting now, which indicates that the pot is charged. If we carefully bring the tube near a strip, a repulsion can be observed-the charges of the tube and the pot are similar. The pot can be discharged by touching it with a finger.
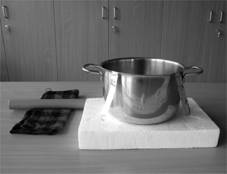
Fig. 1: The pot acting as an electroscope
Now you can introduce the task of how to charge up the pot with a charge of different polarity than is the polarity of the tube. It is not allowed to use different tools than in the previous case. The experiment is suitable for explaining the phenomenon of electrostatic induction. The procedure is the following: put the tube inside the pot without touching the edges. Hold the tube inside and touch the pot with the other hand. After taking the tube out, the tilting of the strips follows. If the tube is brought close to a strip, the attraction of both objects is observed-the charge of the pot must be opposite to that of the tube.
The explanation of this phenomenon has to be given carefully, because it is dealing with the basic principles of nature and it is essential for further comprehension of physics.
The pot could also be used as a Faraday cage. It suffices if you hang a couple of strips on the edge of the pot and let them touch the inner side, while other ones are touching the outer side of the pot. Charging the pot up, only the outer strips are tilted. It is important to explain this phenomenon to the students carefully.
The connections between electrostatics and electricity are not obvious, especially to students at grammar school that are doing these experiments for the first time. They are not able to imagine why there is something common between the strips tilting at the edge of the pot and electric lighting. They are usually asking “Can the pot-electricity light up a bulb?’ It is easy to demonstrate that it is possible (by lighting up a gas discharge lamp, not a bulb, but students will tolerate that) – touching the pot with the edge of the lamp in a dark room, a flash of light appears. The light also appears when you are touching the edge of a gas discharge lamp (which you are holding in your hand) with a charged plastic tube; it happens again even if you are touching the tube at another part, not the edge. It is obvious that the charge is not “moving” inside the plastic tube, but stays on one place, until you are approaching to touch it with the discharge lamp. The pot behaves in another way: only one “flash’ appears, because the charge is probably moving close to the tube. This experiment is a good starting point for further explanations of the behaviour of conducting and insulating materials.
The pot in lectures of electricity and magnetism
Electromagnetic induction, the origin of the eddy current (also known as the Foucault current) and Lenz’s rule can be easily demonstrated with use of a pot. Perform an experiment with the stopping of a magnetic pendulum. Use the stainless steel pot again. Make the pendulum from a piece of string and a small magnet. The appropriate attachment of the string and the magnet can be facilitated by using a screw mounted into the string, onto which the magnets can be easily attached. Set up a holder on which the pendulum can be mounted.
Place the pot bottom up on the table and put the pendulum above (fig.2). Try at first, to see if the pot is made of ferromagnetic material-demonstrate that it is not possible to attach the magnet to it. Pull the pot away and let the pendulum swing above. Count the number of swings and measure the time until the pendulum stops. Then put the pot under the pendulum and let it swing at a sufficient distance (at least few cm above). Repeat the experiment. Any changes in the damping of the pendulum, with respect to the previous case, are not observed. In the last part of the experiment, place the pendulum with the magnet as close to the surface as is possible without touching it. Swing the pendulum again. Its movement is significantly damped (count the number of swings or the time until the pendulum is damped absolutely). Now you can speak about the creation of eddy currents and the reason why the magnetic field created by such a current damps the pendulum’s movement.
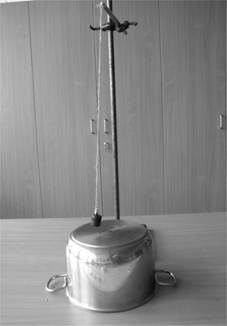
Fig.2: Magnetic pendulum
The pot in lectures of mechanics
The pot can be also used in experiments of mechanics. Try one of them as an inspiration for other experiments. Use the fact that the pot has two handles that serve as two holders. You will also need a string and metal rod (a screw driver or something else). Bind the 50 cm string to the handle. Choose a string which is able to carry the pot, but that is also possible to break (even if it is not easy). It is better to use double-coloured string, because it is more visible. Bind one of the strings to a stable fixture like a blackboard grab handle. The pot with the strings is illustrated in Fig. 3. There is also a string which catches the pot after the breaking of the second string, as otherwise the pot can be damaged after falling onto the ground. Now ask the students which string will break if you are pulling down the lower piece. The answer would probably be “that one on which the pot is mounted”. Everything looks clear and simple. The rigidity of both strings is the same but there is the pot mounted on the upper one. While you are dragging the lower string, the upper string is strained more thus its break follows. However, you can demonstrate that by pulling the lower string, you can choose which string will be broken. But how do you break the lower string? You have to pull fast, but your hand could be injured. To prevent this, coil the string around a rod and then pull quickly. The rupture of the lower string follows. Point out also that the string was not broken at the knot, because the students would be suspicious that you might tie a knot which can be easily broken.
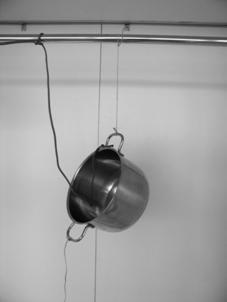
Fig.3: The pot prepared for the breaking of the string. The thicker string acts as a safety device to prevent the pot from striking the floor.
Demonstrate also that you can break the upper string. Tie a new piece of string on the lower handle and pull slowly. Then the break of the upper string follows.
Now you have a lot of things to discuss, especially in the case of demonstrations of Newton’s laws. The pot starts to accelerate due to the force arising from the lower string, it starts to move down and stretch the upper string. This string begins to deform and then reaches its elastic limit. After a sudden tug the force is great enough to induce such a strain that it causes the lower string to reach its elastic limit. However, it is not easy to move the pot because of its mass, as is determined by Newton’s second law. Higher force causes a higher acceleration, but only for a short moment of time. Otherwise, it is acting only until the string is broken; thus the pot does not have enough time to stretch the upper string.
The pot and Archimedes’ Law in gases
This experiment in principle uses the pot for its original purpose- pouring something inside. This something would be CO2 which has a density higher than that of the air; thus the gas stays inside the pot for a while. You can produce the CO2 simply by using a “bomb”, that is, a CO2 cartridge with no water inside the container. (These CO2 “bombs” were commonly used in the Czech Republic in the past to manufacture homemade soda water.) Put a piece of elastic hose onto the siphon pipe to let the CO2 flow into the pot. The aids used in this experiment are illustrated in fig. 4. Put some newspapers onto the pot and let the gas flow inside slowly. After filling the pot up, take out the hose without stirring the gas up. The pot is still covered with the newspaper. Prepare a bubble gun, take the newspaper off and blow some bubbles inside. But be careful-do not blow directly in to the pot-the gas will escape in that case. The bubbles have to be blown, then descend to land in the CO2. This procedure requires training beforehand. The bubbles that have fallen inside will float in the CO2. If you are able to produce bubbles of different sizes and direct them inside the pot, you will observe that the small bubbles are sinking down whereas the large ones are floating above. It is clear that the average density of the small bubbles is greater than the density of the CO2 whereas the opposite situation occurs in the case of the larger ones (the mass of the soap membrane is the reason). It is obvious that Archimedes’ Law is fulfilled for the CO2 in the same manner as for liquids. The observation can be generalized to other gases.
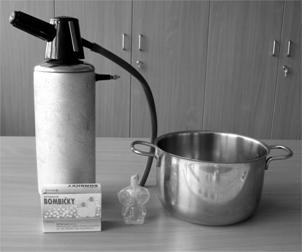
Fig. 4: Tools required for demonstrations of Archimedes‘ Law in CO2
Conclusion
It is possible to perform a lot of other experiments with the pot. You can boil water and measure the power drain of the electrical cooker by using a wattmeter, and compare the times needed for boiling a certain amount of water in a pot with and without a cover, respectively. You can try to determine the specific heat capacity of water, heat capacity of the pot, etc. Also, the students may bring an idea of some physical phenomenon that can be studied and demonstrated with the use of the pot. This is the best evidence that you are teaching physics well.